...Creative Content & Unique Visual Styles For Animation
Links..
Tutorial: Growing & Shrinking Selections In ZBrush
A Step-By-Step Tutorial On How To Grow & Shrink Selections In ZBrush...
Preface
Sometimes we want to group by visibility and using the Shift + Ctrl keys and selection Polyfaces to do that, well… it can be a pain. This technique is similarr to Maya’s Grow Selection, and it even has its key-shortcuts! What we are going to use this technique is to Group different PolyFaces to a finger, so we can eventually moves the different digits to form a pose…
Basic Grow/Shrink Selection Pipeline
The technique is very simple:
(Click on the image!)
1. Isolating a starting point..
1) Use Shift + Ctrl + to select (thus, hiding the rest of the mesh,) a starting point…
WARNING! If you can only see one side of the mesh, go to Tool / Display Properties / Double…
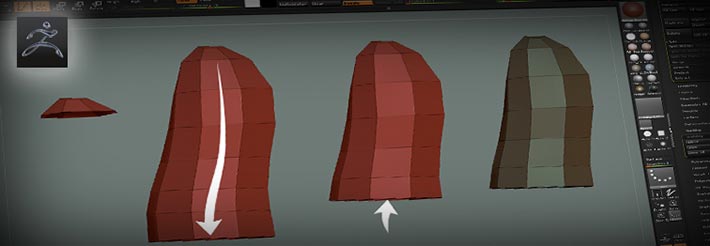
2. Grown / Shrink the selection...
2) Use Shift + Ctrl + X to GROW the selection: the PolyFaces that were hidden near the edges will re-appear…
3) To SHRINK the selection, use Shift + Ctrl + S...
3. Group visible PolyFaces...
4) Once you have all the PolyFaces you want to group, go to Tool / PolyGroups / GroupVisible…
NOTE: To change the color of the newly created PolyGroup, keep hitting on GroupVisible and the colors will cycle until you find one you like!
Done!
5) Shift + Ctrl + Click on the empty canvas to reveal the rest of the mesh…
Done!
Continuing to PolyGroup the mesh…
6) Select the newly created PolyGroup by Shift + Ctrl + Click on the PolyGroup. This will hide the rest of the mesh…
7) GROW the selection (Shift + Ctrl + X) and you will see that the PolyFaces adjacent to the newly created PolyGroup will appear…
8) Once you have enough PolyFaces to Group, Shift + Ctrl + Click on the newly create PolyGroup to hide it…
Continue with Step #4…
Cheers!