Art & Curiosities Of Frank J. Guthrie
Links..
04: Exporting A .STL File Using Ticket01’s Maya Plugin
After you have gone through the preparation steps for your model. there’s one more important step to take care of: smoothing the Model...
Smoothing the Model...
When it comes to StereoLitography, know that, “what you see is what you get”: if your model is not smoothed - meaning that if your model is in level 1 (faceted,) you will get a a faceted print! So what we need to do is smooth the mesh, and know that because StereoLitography’s resolution is hardware-dependent - based on the printer’s resolution, you can smooth the Model to your heart’s content!… but don’t go crazy or the file won’t open…
12) Select the Mesh(s): if there are multiple Polygonal pieces, Combine them together (Polygons / Mesh / Combine)…
13) Select the Mesh and Hit 3 (Smooth Preview)…
14) Go to Modify / Convert and select Smooth Mesh Preview To Polygons. This will “convert” the Smooth Mesh into a Subdivided polygon Mesh with a higher Polygonal count - to preserve the smoothness…
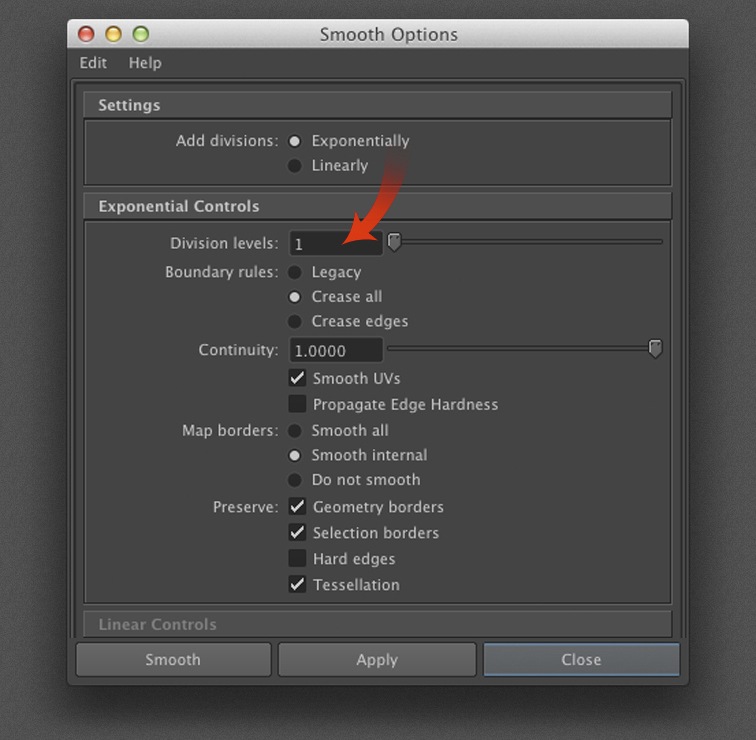
15) Smooth the Mesh once by going to Mesh / Smooth Options. In the Division Levels’ Attribute Box enter 1…
We will smooth the mesh one level at a time until we get “enough” Subdivision. In my case, I made another Smoothing pass. What you want is to have enough Subdivision to get a smooth Print, but not too much so that the file won’t open!. Here are my results:
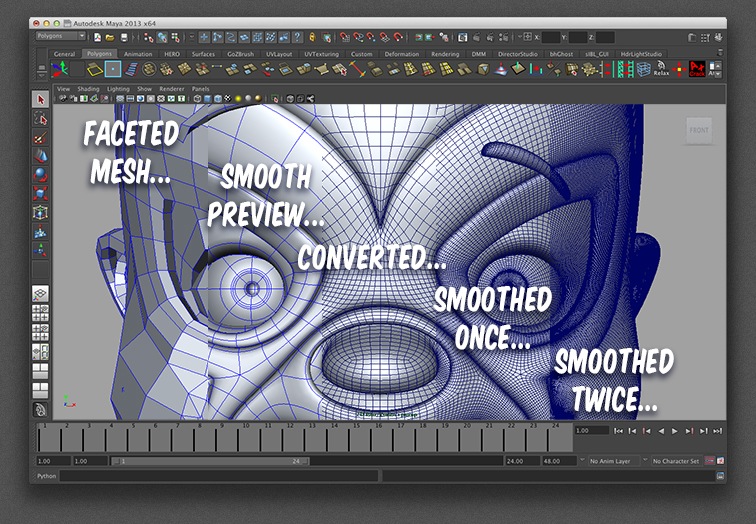
If you look near the ear area, you see so much Subdivision that you can’t see a grid-pattern anymore: STOP THERE!...
Export the smoothed Model...
The plug-in(s) from ticket01 can be found atop the Main Menu. However, we won’t deal with the plugin from the Main Menu, but from the Export Options…
WARNING: The file that we will export MUST be either a Maya ASCII or Binary.
16) Select the Mesh…
17) Go to File / Export All - OR Export Selection’s Button…
18) Choose STereoLitography from the drop down box...
19) A new window pops-up. From the File Type Specific Options, Select the file format ASCII or Binary…
20) Hit Export…
Contacting your local 3D Printshop!...
After exporting your .stl file, all you have to do is locate a Stereolithography Printing Bureau in your area and email them the file for a quote…
I deal with Purple Platypus, a local shop directly associated with the company that manufactures the Object 3D Printers they use, Objet Geometries.
NEXT: Printing the model and what to expect!…