...Unique Creative Styles and Content For Animation
Links
Creating Custom Color-Palettes From Images
A Tutorial on How-To Convert Colors from Images to Custom Photoshop Swatches
Concepts
One of the first things I want to go over is nomenclature: Photoshop has a series of floating UIs, with different tools and attributes - Layers, Brushes, and yes, Swatches. In Photoshop they are called... you guest it, “Palettes,” so let’s not get confused. I will refer to a collection of color-swatches - those small squares of color as in the image above, as a color-Palette. So:
Single color = color-swatch...
Many color-swatches (forming a “range of colors”) = color-Palette...
To avoid confusion, I will refer to Photoshop’s UI-Palettes as Palettes. left’s get started!

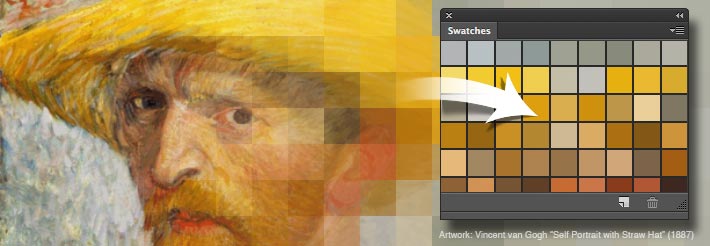
Example #1: Sampling From an Entire Image
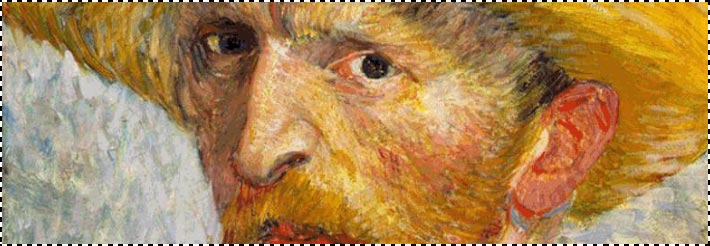
We will first breakdown and create a color-Palette from an entire image and on the second example we will narrow a color-Palette from a specific section of an image. In the first example we will use Vincent van Gogh’s “Self Portrait with Straw Hat” (1887.)
The Process
As you know, in Photoshop there are many ways of doing one simple thing. In these two tutorials I will show you a couple of simple and fast ways to create a color Palette from an image first, and second from a “specific” section of an image, say the skin of a character, the color of an environment or the hues of a photograph. We will end by learning how to save these Palettes as a Photoshop’ Swatches...
Here is the pipeline:
Step 1: copy image into new file and flatten...
Step 2: change the color mode to Index Colors...
Step 3: select what type of color-Palette and how many colors you want...
Step 4: save the color-Palette...
Step 5: load your newly-created color-Palette onto Photoshop’s Swatches, and done! So let’s start...
Step 1
Select your image and copy it into a new file. Flatten the file - if not Photoshop will ask you to flatten the file. To do this go to the Layer’s options and go to Flatten Image. You can also go to the Main Menu / Layers / Flatten Image...
Step 2
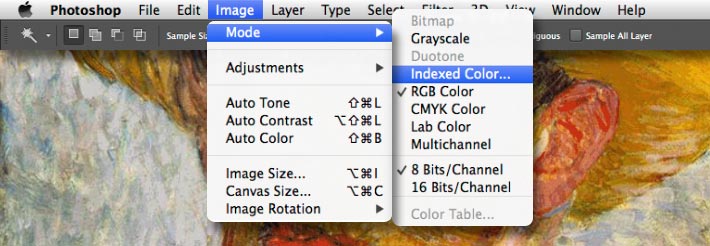
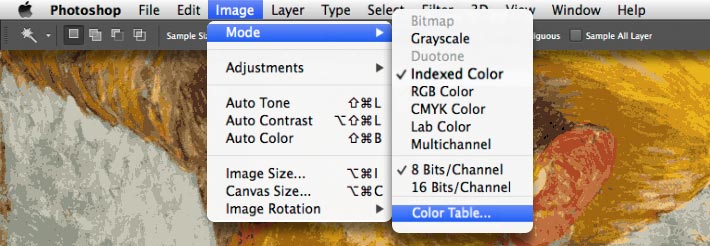
Go to the Main Menu / Image / Mode / Index Color... Again, if you haven’t done so, you will be asked to flatten the image... I told ya!...
Step 3
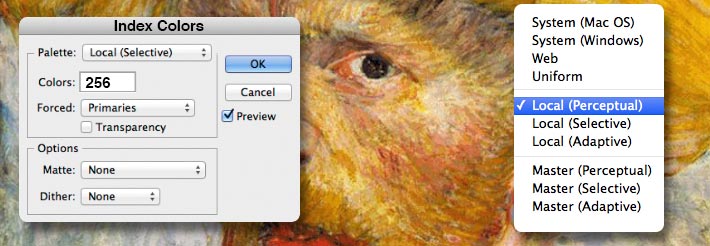
Now we will define what type of color-Palette we will create. We need to pick a color-Palette option along with a number of colors. Let’s see what our options are...
As you can see in the image bellow, we have 10 color-Palette options:
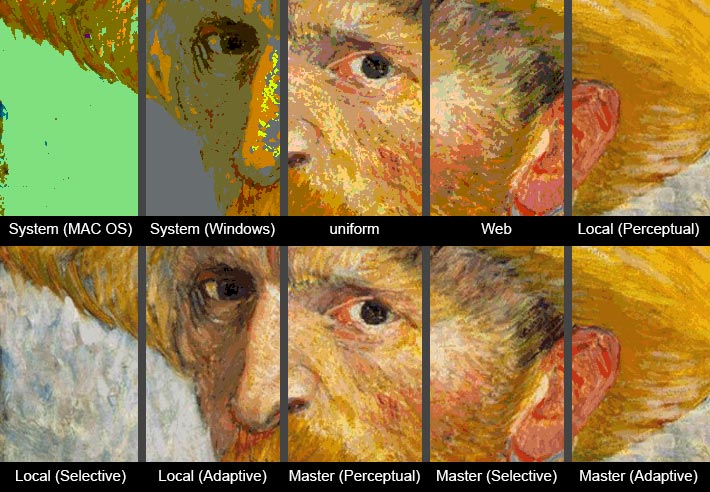
Depending on what choice you make for your color-Palette, you will get a specific color-range. We want to stick to any of the Local or Master options. I recommend: Local (Selective)...
By default, Photoshop sets the number of colors for the color-Palette to 256. These are too many swatches to deal with! Let’s go over and see what we get with the default number of 256:
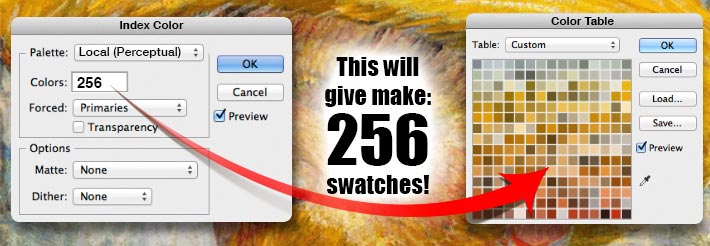
Way too many swatches! However, one of the benefits of using any of the Local and Master color-Palettes’ options, is that we can change the number of colors for our color-Palette. See what we get when we change the number of colors to 16:
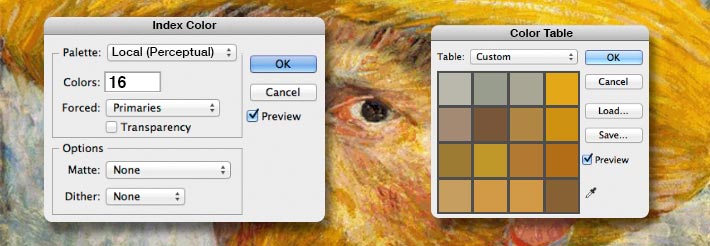
So the choice is yours, but I highly recommend you select a small number to avoid “color swatches-redundancy.” Remember: we want to get the “basic” colors of the image, not the entire color-spectrum!...
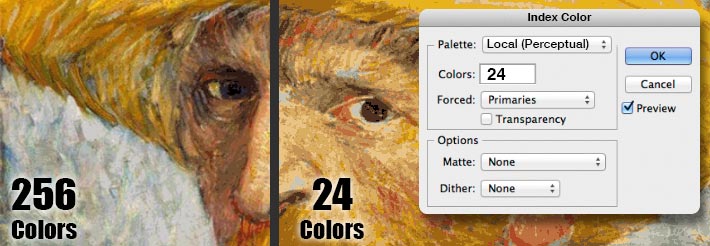
Another thing that you will notice when we select a small number of colors, is that your image gets “Posterized.” This occurs when Photoshop converts the image to a limited color-Palette because the limited number of colors. Don’t worry about this since we are not going to use this image for anything, but thank you Vincent!...
Step 4
Now that we have selected the type of color-Palette, and determine how many colors we want in it, we will save our choice. One concept that may be confusing here is that Photoshop will call this selection of swatches and the choice of color_Palette a “Color Table,” but don’t worry, we will make it into a color-Palette. Go back to the Main Menu / Image / Mode and at the bottom now you will see Color Tables. Select it...
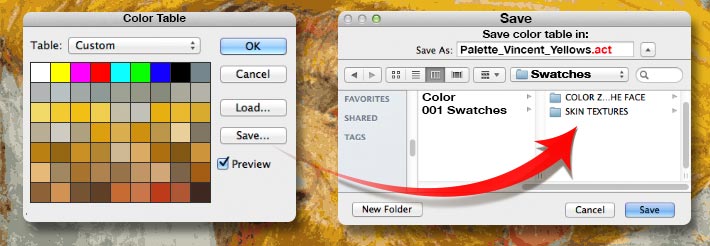
You will see your new color-Palette along with some base colors (white, yellow, green, black, etc...) These color-swatches we don’t worry about. Now click on the Save button and place your new color-Palette in the folder of your choice. Make sure that the file’s extension is .act (Adobe Color Table)...
When it comes to the correct “place” to save your color-Palettes, it is completely up to you. I recommend to keep your custom-color-Palettes in one place - say a folder called COLOR, where you keep anything to do with color (color-wheels, color samples, color references, etc...)
Step 5
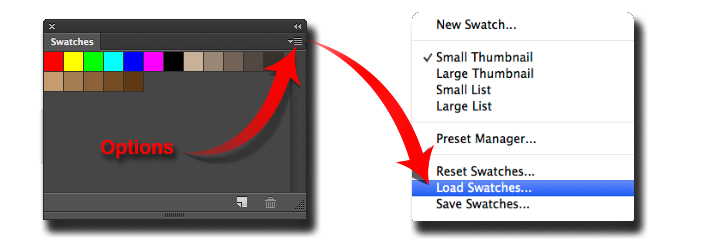
Let’s load our new color-Palette into Photoshop’s Swatches UI-Palette. Find the Swatches Palette and go to the Palette’s Options: select Load Swatches. Find the file you just saved and load it. You will have the option to “Append” the new colors bellow what you already have or just simply replace all the color-swatches in the UI with your new ones...
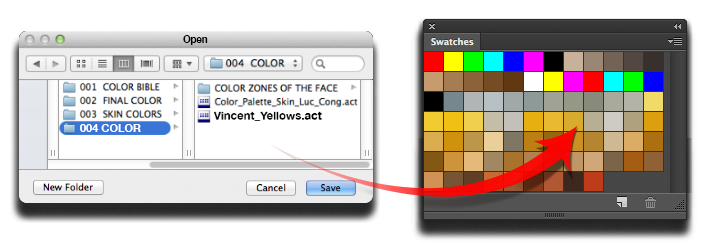
And voila! You have just loaded your own custom color Palette based on an image!
TIP: You can delete the basic color swatches Photoshop has in the Swatches Palette (see how in example #2) and then save the “clean” custom color-Palette!
The next example I will show you a second method that more specific but more hands-on. This example will allow you to be more “selective” with the colors we will save into a new custom color-Palette...

Example #2: From Selective Parts of the Image
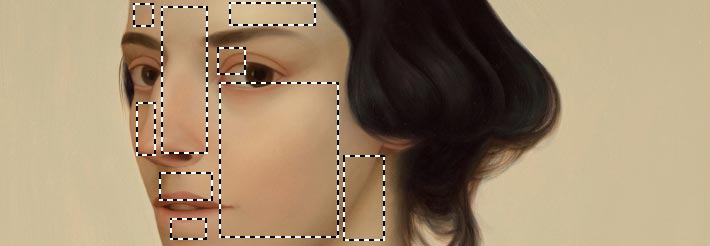
In this example, we will use this amazing painting, “Study of Liza” (2010) by Luc Cong. We will create a color-Palette for a “specific” region of an image. So for this example let’s say that we wanted to create a custom color-Palette based on the skin of the subject, Liza...
The Process
As you know, in Photoshop there are many ways of doing one simple thing. In these two tutorials I will show you a couple of simple and fast ways to create a color Palette from an image first, and second from a “specific” section of an image, say the skin of a character, the color of an environment or the hues of a photograph. We will end by learning how to save these Palettes as a Photoshop’ Swatches...
Here is the pipeline:
Step 1: copy the section(s) of the image you want to sample onto a new layer...
Step 2: lock the layer’s transparency...
Step 3: apply a Mosaic filter...
Step 4: hand-pick the colors from the result of the Mosaic filter onto the Swatches’ Palette...
Step 5: edit and save your custom color-Palette, and done! Let’s get started...
Step 1
With the Lasso or the Marquee tools, select as much of the skin as possible. You want skin-variations - dark, medium and light tones, plus as much color variation as you can find. Copy these selections onto a new layer...
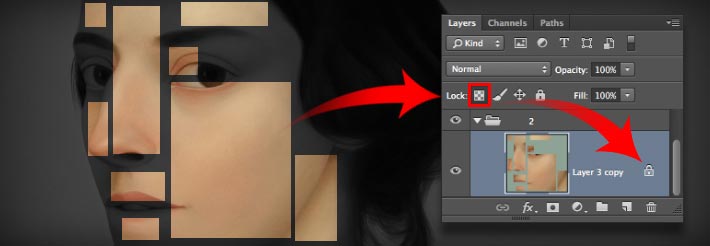
Step 2
Copy these selection onto a new layer and lock the Transparency. This is very important because if we fail to do so, the next step - applying the Mosaic filter, will “dilute” its effect...
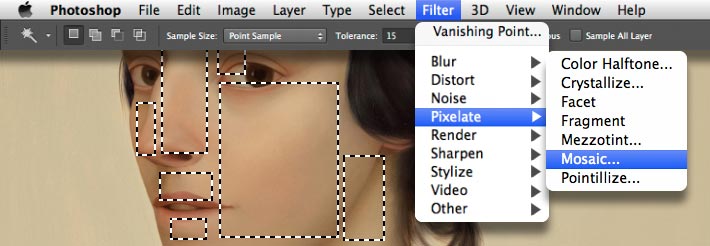
Step 3
Go to the Main Menu / Filters / Pixelate and select the Mosaic filter...
What this filter does, it breaks the image into squares, averaging the color within each square, or what Photoshop calls, the Cells. As you can see, the larger the Cell Size, the larger the Mosaic’s squares...
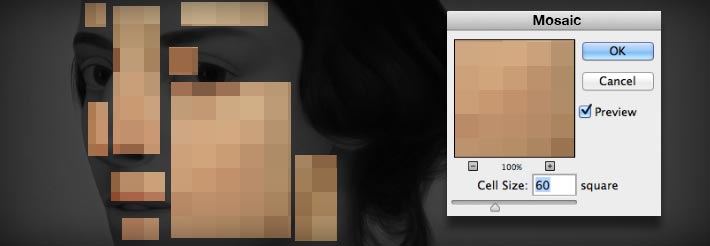
Cell Size of 60...
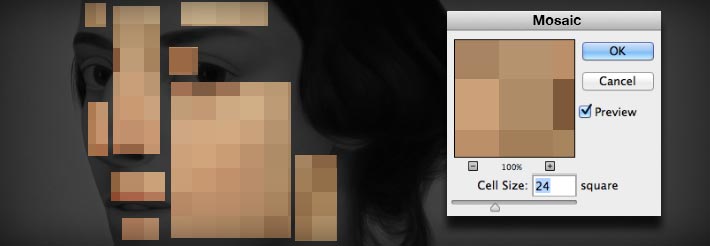
Cell Size of 24...
Same as in the first example, we want a small amount of swatches. Remember: we want to get the “basic” colors of the image. So select a small Cell Size in the Mosaic filter, let’s say 16...
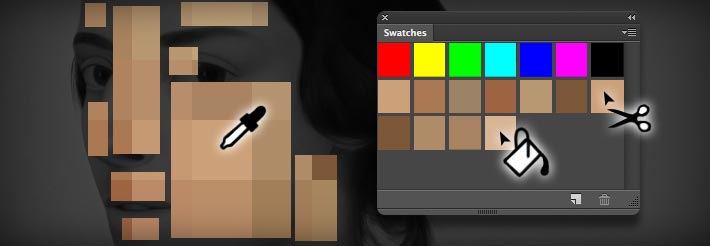
Step 4
Once we apply the mosaic filter, we need to hand-pick the colors we want...
Use the Eyedropper and select your first color. Then move your mouse over the Swatches Palette and you will see that the icon turns from an Eyedropper to a Paint Bucket!...
With the Paint Bucket, click anywhere on the empty area of the Swatches’ Palette and you will create a new color-swatch square...
Tip: If you don’t like the color you have dropped, no problem: move the mouse over the color-swatch you want to delete and hold Option - Alt on PCs: the icon now turns into the Scissors. Click on the color-swatch with the Scissors and its gone!...
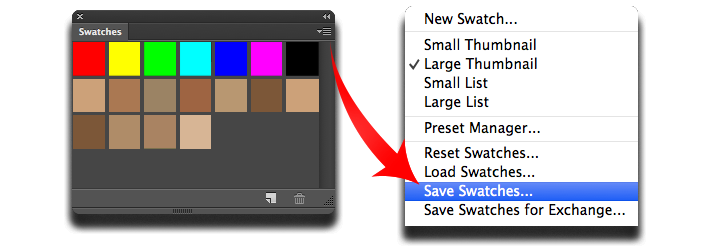
Step 5
Once you have selected and dropped your colors in the Swatches’ Palette, save the Palette. Go to the Swatches’ Palette Options and select “Save Swatches...”
Tip: If you want to use your newly-created custom color-Palette with another Adobe product, such as Illustrator, InDesigns, etc, save using “Save Swatches For Exchange”...
So I hope this helps you in creating amazing color styles, color studies, color Bibles and anything that starts with the word color!
Cheers!